Kado Home
Moving a sofa through a narrow hallway can feel like solving a stubborn puzzle. One wrong lift may damage a door frame, tear upholstery, or strain your back. This guide explains How to disassemble a sofa for moving with practical steps that fit real homes, apartments, and tight stairwells. It focuses on preparation, safe handling, and careful labeling.
Moving consultant Ross Sapir, founder of Roadway Moving Company, advises, “Protect the home before you protect the sofa.” That principle matters. Place cardboard along sharp corners, clear the walking route, and photograph every connection before removing anything. The seven easy tips will cover measuring doorways, removing cushions, checking hidden fasteners, detaching legs, separating modular sections, wrapping delicate surfaces, and organizing hardware.
Use a screwdriver, adjustable wrench, zip bags, masking tape, and thick moving blankets. Keep screws from disappearing under the rug. Label each bag with its exact location, such as “left arm, rear bolt.” Small details save time later.
Do not force stubborn parts.
Some sofas have clips, staples, or reclining mechanisms that require different handling. The safest method is not always the fastest one. I have seen moving plans fail because people assumed every sofa was built the same way. Check the manufacturer’s instructions when available, and ask for professional help if the frame feels unstable or the mechanism is unfamiliar. A careful disassembly protects both the furniture and the people carrying it.
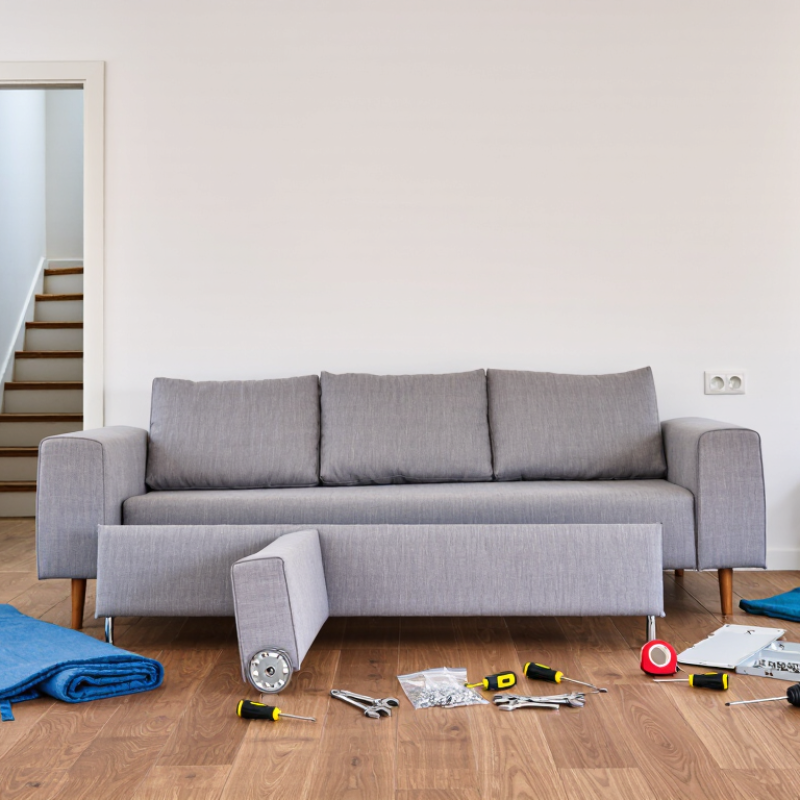
Before removing anything, study how the sofa is built. Look underneath for bolts, clips, staples, and wooden rails. Photograph each connection, then label screws in small bags. Check whether the legs, arms, back, and cushions detach separately. A fixed frame may resist disassembly and suffer damage if forced. I once assumed a backrest was removable, but it was sewn into the upholstery. That mistake cost time and caused a small tear.
Measure the sofa, doorways, hallways, stair turns, and elevator opening. Measure twice. Compare these figures with the sofa’s packed dimensions. Estimate its weight by checking the frame materials, sleeper mechanism, and internal storage. Solid wood and metal parts can make one section surprisingly heavy. Plan for two or more adults when lifting bulky pieces. Never rely on strength alone. Use moving blankets, gloves, and a properly rated hand truck.
Protect the route before disassembly begins. Remove doors only when necessary, and handle hinges carefully. Keep children and pets away from the work area. Start with cushions and loose covers, then remove legs and accessible hardware. Do not cut upholstery until the construction is confirmed. If a section does not move after removing the fasteners, pause and inspect again. My first attempt was rushed, and I missed one hidden bolt. A simple diagram would have prevented that delay.
Before removing anything, photograph the sofa from every angle. Capture cushion positions, leg orientation, seam locations, and hidden brackets. Use bright light. Include a ruler beside unusual bolts or washers. These images become a visual record when memory fails. The U.S. Bureau of Labor Statistics reported 1,190 fatal injuries in transportation and material-moving occupations during 2023. This supports careful handling, even for a household sofa.
Place each cushion in a numbered cover, then photograph the label. Mark covers as “left arm,” “back,” or “seat,” using removable tags. Never rely on shape alone. Store legs in a sealed bag, and label the bag with the sofa’s position. Keep bolts with their matching frame section. Different hardware can look almost identical. It often is not. A simple sketch beside each photo adds useful context. Do not write directly on fabric, leather, or finished wood.
Use a small tray for loose washers and clips. Photograph the tray before sealing it. Record the removal order in short notes, such as “rear panel, four bolts.” This follows traceability practices used in professional moving inventories, where item identification reduces handling errors. The American Moving and Storage Association has long emphasized documented inventories for household moves. Still, labels can peel off. Add a second paper tag inside each bag. My only caution is practical: photographs may show where a part belongs, but not how tightly it was installed. Mark damaged threads, missing caps, or uneven seams before disassembly. Those details deserve honest records.
How to Disassemble a Sofa for Moving 7 Easy Tips?
A sofa can look light until its frame catches a doorway. Remove cushions, legs, loose fabric, and detachable arms before lifting. Photograph each connection, then label screws in small bags. Check underneath for staples, brackets, and hidden bolts. Wear work gloves, but keep them snug around your fingers.
NIOSH’s Revised Lifting Equation uses a 51-pound load constant under ideal starting conditions. That number is not a guaranteed safe lifting limit. The equation adjusts for reach, height, twisting, repetition, and hand grip. A wide sofa frame may require much more effort than its scale weight suggests. Keep the frame close to your body. Lift from a stable height. Avoid turning while carrying it.
Use two or more people when the frame feels awkward, even if it weighs less than 51 pounds. One person should direct the movement through narrow spaces. Move slowly around stair edges and door thresholds. A lifting strap can improve control, but it cannot remove the load. I once focused too much on weight and ignored the frame’s uneven shape. That was a useful mistake. Stop if anyone feels back strain, numbness, or loss of grip. Recheck the disassembly plan before forcing a stuck joint.
NIOSH’s Revised Lifting Equation uses a 51 lb load constant under ideal conditions. As horizontal reach increases, the recommended weight limit decreases.
Illustrative calculation: RWL = 51 × (10 ÷ horizontal reach). The vertical location, travel distance, twisting angle, lifting frequency, and hand coupling are held at ideal values, so this chart is not a substitute for a task-specific ergonomic assessment. Before moving a sofa, remove cushions and detachable parts, separate the frame where designed, and use team lifting or mechanical assistance for heavier sections.
How to Disassemble a Sofa for Moving: 7 Easy Tips
Remove cushions, covers, legs, and detachable arms before lifting the sofa. Photograph each connection, then place screws in labeled bags. Tip one: check the frame for hidden brackets. Tip two: use work gloves with firm grip. Tip three: wear eye protection when releasing springs or staples. Tip four: keep a clear route from the room to the vehicle. A four-wheel dolly and rated lifting straps can reduce twisting. Never rely on a strap that shows cuts, stretched stitching, or damaged hooks. Two people should share awkward loads, while heavier sections need a trained team and proper lifting equipment.
Wrap each component with clean moving blankets, then add edge guards around corners. Use stretch film only to hold blankets, not to compress delicate upholstery. ASTM D4169 principles encourage thinking about distribution hazards, including vibration, compression, drops, and shifting. Apply that logic by cushioning contact points and preventing parts from rubbing together. Secure the sofa frame against the vehicle wall with suitable restraints. Do not overtighten them; crushed foam is permanent. Inspect every wrapped piece before carrying it. One careless corner can tear fabric.
A practical mistake is wrapping too early. Dust and loose staples can become trapped against the upholstery. Vacuum first, and inspect the underside with a flashlight. OSHA-aligned aids support safer handling, but they do not replace training, equipment checks, or site-specific procedures. Test the route with an empty dolly. Awkward turns reveal problems quickly. Recheck labels and fasteners at the destination before reassembly. Damage is often discovered late.
| Step | Disassembly and Moving Task | Recommended Procedure | Useful Data and Checks | OSHA-Aligned Safety Aid | ASTM D4169-Informed Protection Principle |
|---|---|---|---|---|---|
| 1 | Plan the route and document the sofa | Measure doorways, hallways, stair turns, elevators, and the final placement area. Photograph connection points and label each removable part before taking anything apart. | Door clearance: sofa width + handling space Record hardware locations Mark left/right orientation | Keep walkways free of cords, tools, and loose packaging. Use adequate lighting and maintain a clear exit route. | Establish the package configuration first so the finished load can be inspected for fit, stability, and possible contact points. |
| 2 | Remove cushions and loose accessories | Remove seat and back cushions, headrests, storage contents, and detachable covers. Place small hardware in a sealed, labeled pouch taped to the related component. | Count every cushion Keep hardware grouped Protect zippers and seams | Lift cushions close to the body and avoid twisting. Use gloves when handling staples, exposed fasteners, or rough frame edges. | Separate loose parts to prevent rubbing and impact between components. Use cushioning that prevents shifting during handling. |
| 3 | Detach removable legs and feet | Turn the sofa only with sufficient assistance. Support the frame, remove legs with the correct hand tool, and place washers, bolts, and feet in the labeled hardware pouch. | Do not drag the frame Inspect threaded fittings Keep fasteners dry | Coordinate the lift before changing position. Avoid placing fingers beneath pinch points and use mechanical assistance when the load is bulky or difficult to control. | Cover protruding fittings and isolated hard points so they cannot puncture protective wrap or damage adjacent pieces. |
| 4 | Separate detachable sections or arms | Check beneath upholstery flaps and inside connecting brackets for bolts, clips, or locking hooks. Release fasteners gradually while another person supports the section being removed. | Support both sides Label each section Retain all brackets | Use team communication and planned hand positions. Do not force a stuck connector; inspect for hidden fasteners before applying more effort. | Keep separated sections from contacting one another. Add edge protection where frame corners or brackets could receive concentrated contact. |
| 5 | Protect upholstery and structural surfaces | Cover clean, dry upholstery with breathable protective material, then add a durable outer layer for handling. Use corner guards or folded padding on frame edges. | Keep fabric dry Do not compress cushions Avoid adhesive on upholstery | Wear suitable gloves and closed-toe footwear. Keep wrapping materials secured so they do not create trip hazards or obstruct visibility. | Use a layered package: surface protection, cushioning, and an outer restraint layer. The wrap should reduce abrasion, moisture exposure, and minor handling impacts. |
| 6 | Carry and load components safely | Assign one person to direct movement. Carry large pieces at a controlled pace, use a suitable dolly or lifting aid when appropriate, and keep the load stable through doorways and stairs. | Use a two-person lift for bulky sections Keep hands visible Maintain load balance | Plan the lift, avoid sudden movements, keep the load close, and stop if visibility or footing is compromised. Do not exceed the rated capacity of any handling aid. | Position heavy pieces low and distribute weight evenly. Prevent movement with restraints that hold the load without crushing upholstery. |
| 7 | Secure, inspect, and reassemble | Place components on a clean, stable surface, inspect for moisture or damage, verify the hardware pouch, and reassemble in the reverse order using the labels and photographs. | Check every connector Confirm legs are tight Test stability before use | Remove tools and packaging from the work area. Complete a final stability check and do not use the sofa if a frame, fastener, or connector is damaged. | Inspect the load after handling for shifted cushioning, torn wrap, exposed edges, or compression. Correct any weakness before the next movement stage. |
| Note: OSHA provides workplace safety guidance for hazard control, lifting practices, protective equipment, and material handling. ASTM D4169 is a distribution-cycle testing framework for packaged products; the protection recommendations above apply its general concepts of cushioning, restraint, load stability, inspection, and resistance to handling stresses rather than serving as a product-specific test certification. | |||||
A careful reassembly begins before the first bolt leaves the frame. Photograph every joint, label each fastener, and store hardware in sealed bags. Mark left and right parts with masking tape. This prevents reversed brackets and missing washers later.
BLS reported 2.6 million nonfatal workplace injuries and illnesses in 2023, while lifting and bodily reaction remained major injury categories. Sofa moving deserves the same ergonomic caution. Use two people for heavy sections. Protect your back.
During reassembly, follow the manufacturer’s instructions before using general repair habits. Check bolts for stretched threads, damaged heads, corrosion, or flattened washers. Inspect threaded inserts inside timber or metal rails. They should not spin, wobble, or pull outward.
Examine welds, corner blocks, brackets, staples, and visible cracks under bright light. BIFMA X5.4 evaluates lounge seating through durability, static-load, and stability testing. Its guidance supports systematic inspection, but it does not replace the product’s engineering instructions.
Do not substitute longer screws. They may pierce upholstery or weaken hidden components.
Tighten fasteners gradually in a cross pattern. Stop when the specified torque is reached. If no torque value exists, tighten firmly without crushing wood or stripping inserts.
I sometimes recheck every joint twice; that feels slow, but missed hardware causes movement and noise.
Sit gently, test armrests, and listen for clicks. A slight frame shift deserves another inspection, not a quick assumption. Keep unused parts aside until the sofa passes a final stability check.
Photos record cushion positions, leg direction, seams, brackets, and hidden connections. Use bright light. Memory is unreliable.
Place each cushion in a numbered cover. Add removable tags such as “left arm,” “back,” or “seat.” Do not rely on shape alone.
Store bolts, washers, clips, and screws in separate sealed bags. Label each bag by frame section. Add a second paper tag inside.
Photograph unusual bolts with a ruler beside them. Note damaged threads, missing caps, uneven seams, and loose brackets. Sketch difficult connections.
Not necessarily. Shape, reach, twisting, and grip can make a lighter frame difficult. Use two people when the frame feels awkward.
Keep it close to your body. Lift from a stable height. Avoid twisting near stairs, thresholds, and narrow doorways.
Check bolts, washers, threaded inserts, brackets, welds, corner blocks, staples, and cracks. Look under bright light. Small damage matters.
Tighten gradually in a cross pattern. Follow the instructions when available. Avoid crushing wood, stripping inserts, or using longer screws.
Sit gently and test the armrests. Listen for clicks or shifting. Keep spare parts aside until every joint passes inspection.
Do not judge safety by weight alone. I once ignored an uneven frame shape. That mistake changed my planning. Stop when grip or back comfort disappears.
How to disassemble a sofa for moving begins with a careful assessment of its construction, weight, and the available doorways, hallways, stairs, and vehicle space. Check whether the sofa has removable cushions, covers, legs, arms, or modular sections, and identify any parts that should remain attached. Before taking anything apart, photograph each side and connection point, then label cushions, covers, hardware, and frame pieces so reassembly is straightforward.
Work slowly and use suitable tools to separate the frame without damaging upholstery or weakening structural joints. Heavy components should be lifted with proper technique and, when necessary, handled by two or more people. Wrap each part to protect it from scratches, dirt, and impact, and secure loose hardware in labeled bags. During transport, distribute weight evenly and prevent components from shifting. After delivery, follow the photographs and labels to rebuild the sofa, tighten fasteners carefully, and inspect the frame, legs, cushions, and joints before use.
